
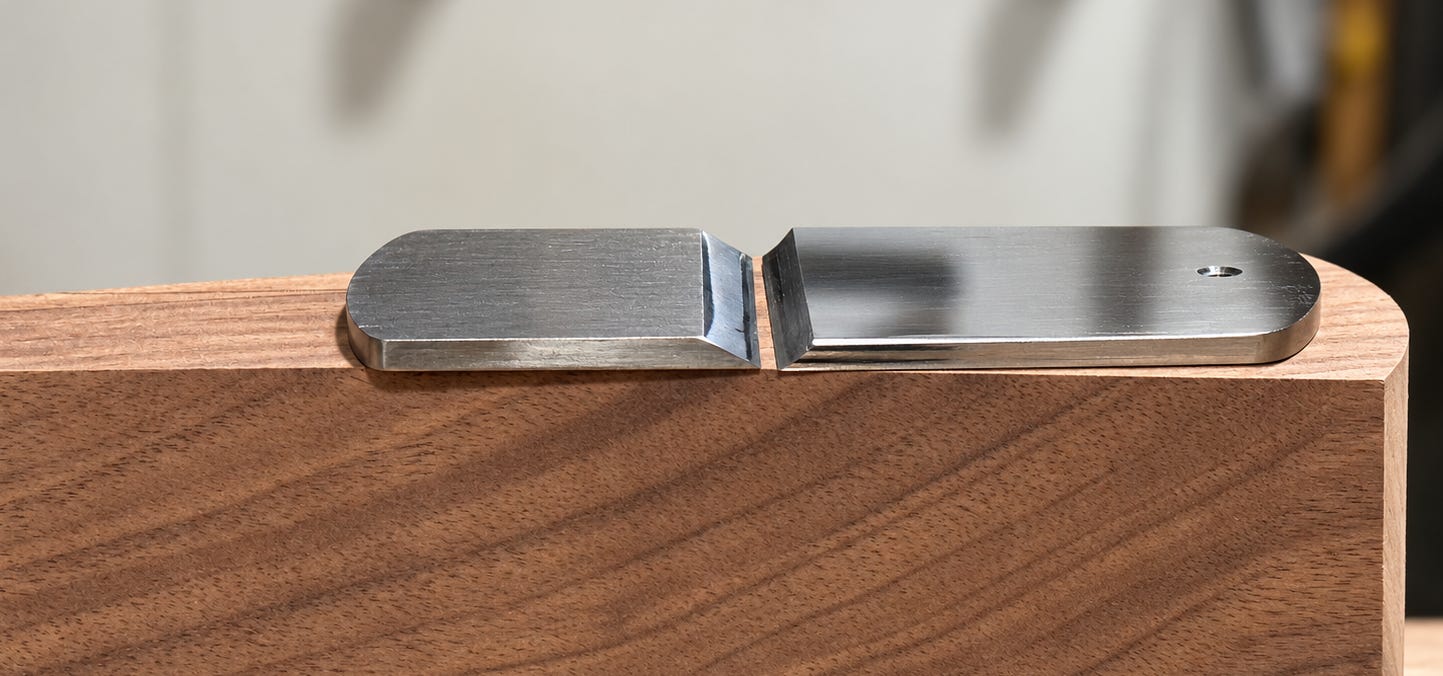
These two blades actually have the same clearance angle even though the one on the left looks like it would have more. The heel on the right hand blade will sit lower on the frog giving the edge more support. The clearance only matters being the part of the blade that protrudes below the plane’s sole.
In Flat Thinking, I asked why we grind a hollow into a plane blade and then take it to a flat stone to hone away part of that curve. The hollow gives us two convenient points of contact, at the cutting edge and the heel. That makes freehand honing easier. But convenience does not always lead us to the best technique. I have been taking my blades from the grinding wheel to a round honing surface instead. The more I work with that idea, the more questions I find at the grinder itself.
My current CBN grinding wheels have edges rounded to a 3/16-inch radius. On the flat face of an 8-inch wheel, the hollow I grind follows the wheel’s 4-inch radius. As I turn the blade around its rounded corner, I can make a much tighter curve. In principle, that corner gives me a range of possibilities from the broad curve of the wheel face toward the much smaller radius at its edge. That’s a range of 4” radius to a .186” radius. At this point I am using the term radius loosely as I don’t know what shape the exact resulting curve is when approaching a wheel’s corner radius.
The orientation for grinding a 1/2” radius with this 8” grinding wheel puts the blade at about 6 degrees the the flat face of the wheel to take advantage of the 3/16” radius corner. Because of this angle, I have increased the radius manufactured on the wheel’s corner.
I tried it recently on a spokeshave blade that is .125 inch thick. I turned the blade around the corner until I had a hollow that looks roughly like a 1/2-inch radius. I have no way to measure the curve other than to compare it to a cylinder I have. So I compared it to various forster bit radii. It seemed to fit the 15/16” best. I would not be surprised if its cross section turns out to be something other than a circular arc, perhaps closer to part of an ellipse. For now, the exact name of the curve matters less to me than what it does toward generating the clearance I want while offering the best support I can get.
The edge needs an angle that will cut. The surface immediately behind it needs enough clearance to keep from rubbing the wood. And the steel farther back needs to support that edge without putting the heel so low it interferes with the cut. With this grind, I can see plenty of room for clearance behind the edge, while the heel sits very close to the bottom of the frog, or blade bed. That is a different distribution of steel from the long flat bevel I used for decades. When I grind straight into the flat face of the wheel, I can make a drawing that explains the edge angle. At the point of contact, a tangent to the wheel’s circle describes the direction of the ground surface. If I know where the cutting edge is relative to the wheel, I can calculate that tangent.
Around the corner, the drawing is harder.
The wheel’s edge curves in another direction, and angling the blade sidways changes how its bevel meets that surface. I can see the curve I have made, but I cannot honestly call the whole thing a 1/2-inch radius just because it looks like one. Nor can I assume that a radius estimated from the hollow tells me the tangent right at the cutting edge. Those are questions I want to work out, rather than cover with a number that sounds more precise than my observation.
Because of this challenge of naming or measuring this curve and resulting tangent angle, I have to shoot from the hip. I did this in my early experiments with grinding upside down and backwards. That was an easy entry to eventually start playing with this more unusual approach. And you can apply the same methods I imagine most of you used when grinding conventionally; grind, check angle; adjust as needed to correct the geometry. So far that’s all I have been able to do with this around the corner business.
My next step is to hone this blade on a 3/4-inch-diameter steel shaft charged with diamond compound. That shaft has a 3/8-inch radius, a little tighter than the apparent curve I ground. I want to see where it contacts the bevel, how small an area it hones at the edge, and whether I can finish that edge without flattening the relief behind it.
There is a useful calculation here, though it answers a narrower question than I first hoped. The blade-elevation chart in Flat Thinking gave heights for different tangent angles on an 8-inch grinding wheel, which has a 4-inch radius. If I want the corresponding height for the same tangent angle on my 3/4-inch honing shaft, I can divide those values by 10⅔, because 4 inches divided by 3/8 inch is 10⅔ (10.666…). That locates a tangent on the shaft. It does not tell me the exact shape or edge angle of the bevel I ground around the wheel’s corner. It gives me an easier one to calculate.
I am still at the stage where the blade can teach me more than a diagram. I will hone it, put it in a plane, and look at both the edge and the work it leaves behind. Then I can take a closer look at the bevel’s actual curve and try to describe the geometry more accurately.
The question that started this was simple: why flatten a hollow that is already useful? Now I am wondering how much freedom we have to shape that hollow in the first place, and how much can we improve a tool’s performance with this kind of geometry at the business end.
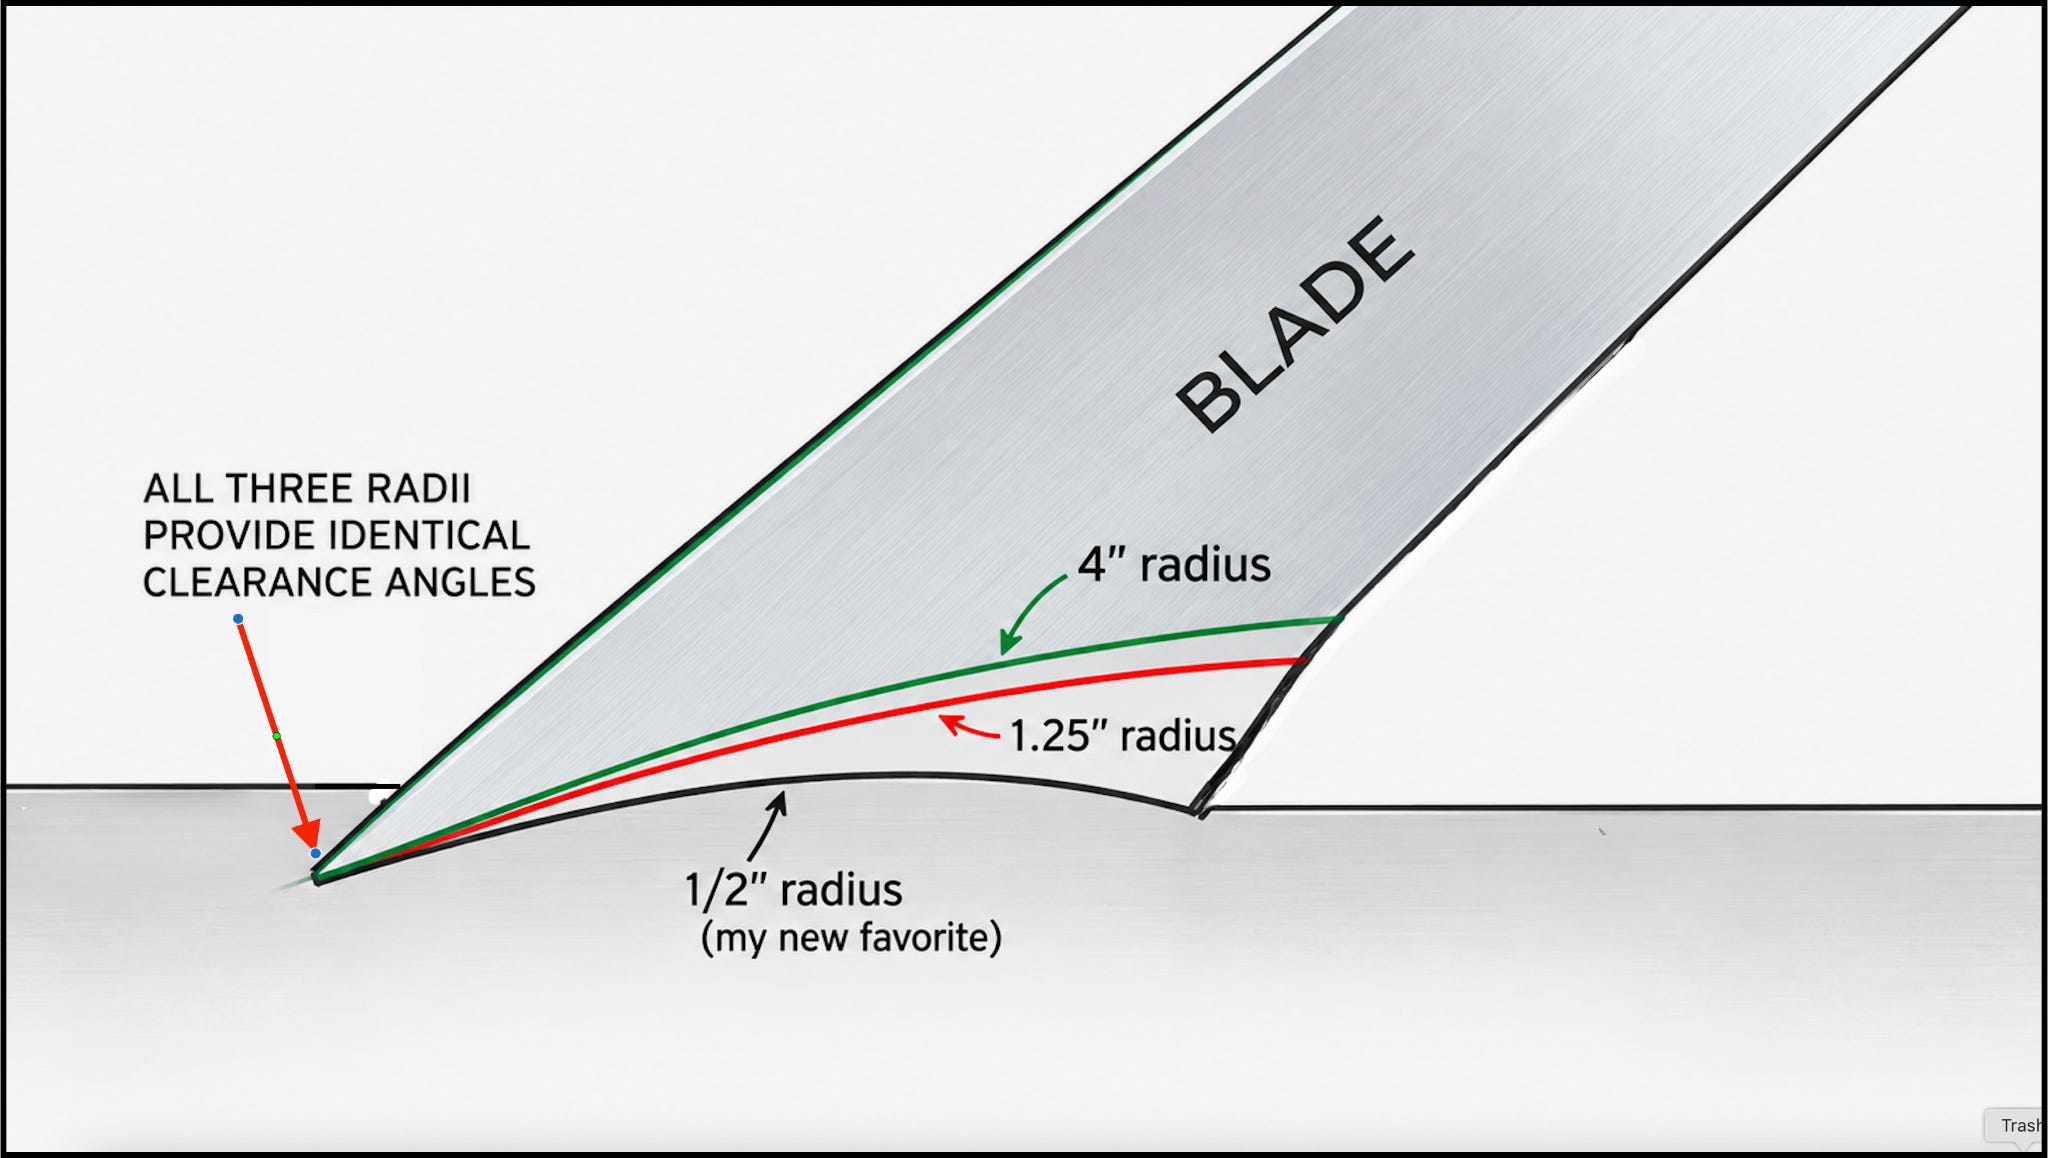
This image illustrates various hollow grinding possibilities that increase edge support. All three radii shown provide identical clearance angles. The top one in green illustrates a 4″ radius (from ab 8″ wheel), the red shows the 1.25″ radius, and the black shows my new favorite, a 1/2″ radius. (not to scale)
I have been playing around with this for a couple of years now using various methods to get the smaller radius. I even made a machine to get what I thought was best. But being able to get a variety of hollow ground radii from my new grinder has opened up a new way to explore this idea and one I think you may be pretty close to doing as well. I did not share this until now because I didn’t have a method that I thought would fly in most shops. I think this one can for those curious enough to play with it.
What I have found so far is that the planes I hone this small radius bevel on perform noticeably better and cut well longer than what I used to use. I am remembering my younger brother’s fly tying comment in sharing all this because I think it is fitting. He ties his own flies and catches more fish with them than commercial ones. He can’t prove which is better but thinks he generally fishes better when using his own flies because he feels more connected to what he is presenting. Likewise, I suspect that all the attention I have been putting into my edges as I explore this stuff is resulting in better sharpening through greater attention applied.
After first testing this idea, one of my employees borrowed my plane to clean up a piece he was working on. After a few minutes he came back and asked what I did differently. I had not told him anything about what I was doing. But the difference was noticeable enough to get his attention and recognize a change in the tool’s performance. I will be not only using this method, but exploring new ideas as they present themselves. I write this in hopes you will join the experiment and let me know what happens.
I hope to get an instructional video out soon to teach folks exactly how to make this grinding fixture. I have played with a variety of ideas and this one is hands-down the best I have come up with. The one I will teach in the video will be mostly wood rather than aluminum extrusions and use an inexpensive conventional grinder. I am enjoying the precision of my Toycen and can’t say enough good things about it. But I don’t want you to think it is necessary to have that grinder to enjoy what you can do with these tight radius bevels.
But I should tell you why I bought this higher-end grinder. With CBN wheels, the precision of the grinder (primarily how truly the shaft spins) matters a lot more than when using friable aluminum oxide wheels. With aluminum oxide, you true the wheel on the shaft to clean up uneven wear or crown the wheel as needed. This gets the grinder surface running true, even if the shaft it spins on is not. With CBN wheels any eccentricity in the shaft translates to wobble in the wheel. A CBN wheel that is not spinning truly will either vibrate the tool you are trying to grind accurately and likely only have one contact point on the wheel rather than using the entire wheel’s surface. I don’t know what the tolerances are on most grinders as most do not spec that. That’s why I bought a Toycen. They spec their shaft runout to be under .0002” (2 ten thousandths of an inch.)
So go get some stuff sharp and let me know what you experience with these tight radii.
From the Bench, Brian Boggs
Brian has spent more than four decades learning from wood, tools, mistakes, teaching, and making. He is still at the bench, working, questioning, experimenting, and finding new things to understand and share.
These essays are our way of capturing that ongoing work and putting it into the world.
If you believe this kind of knowledge is worth documenting and sharing, becoming a paid subscriber helps support the work of capturing it while Brian is still at the bench.


