
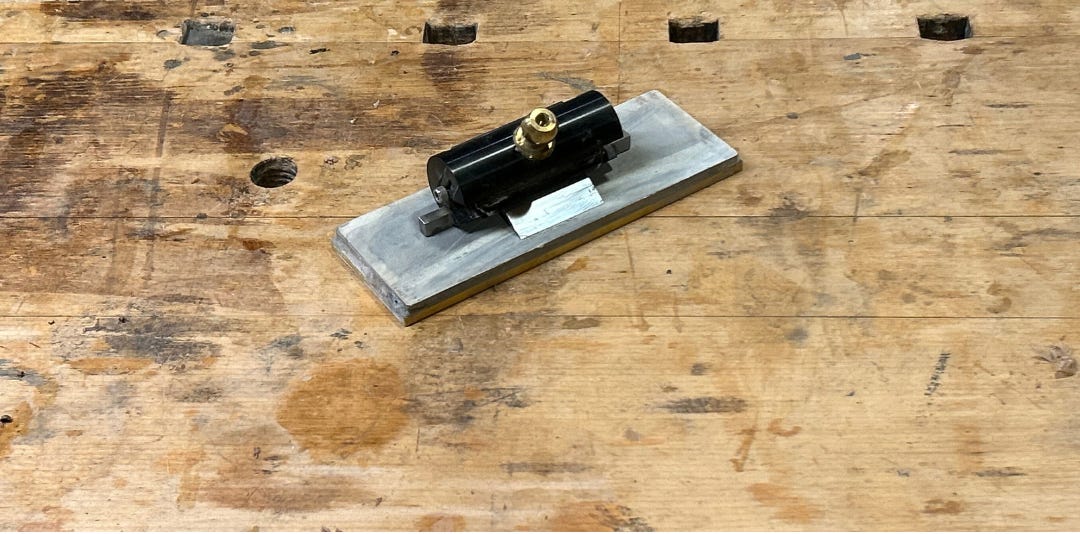
Nano Hone makes my favorite flat stones and guide. But I am questioning what I use them for, not whether they are essential to my sharpening kit.
In my prior essay, Abrasive Behavior, I introduced a way of grinding that allows me to take an edge remarkably close to finished with an 80 grit CBN wheel.
There is a lot more to say about how I do that. But there is an even more interesting question hiding behind it.
Because the advantage isn’t just speed.
Once you can control what is happening at the very edge with that kind of precision, you begin to see possibilities that are harder to see when grinding is simply something you do before sharpening.
I don’t imagine many of you have already gone out and made the grinding fixture I described. I’ll explain how to do that later. But first I want to show you where I go from that ground edge, because it has led me straight into another challenge to the traditional way we think about sharpening.
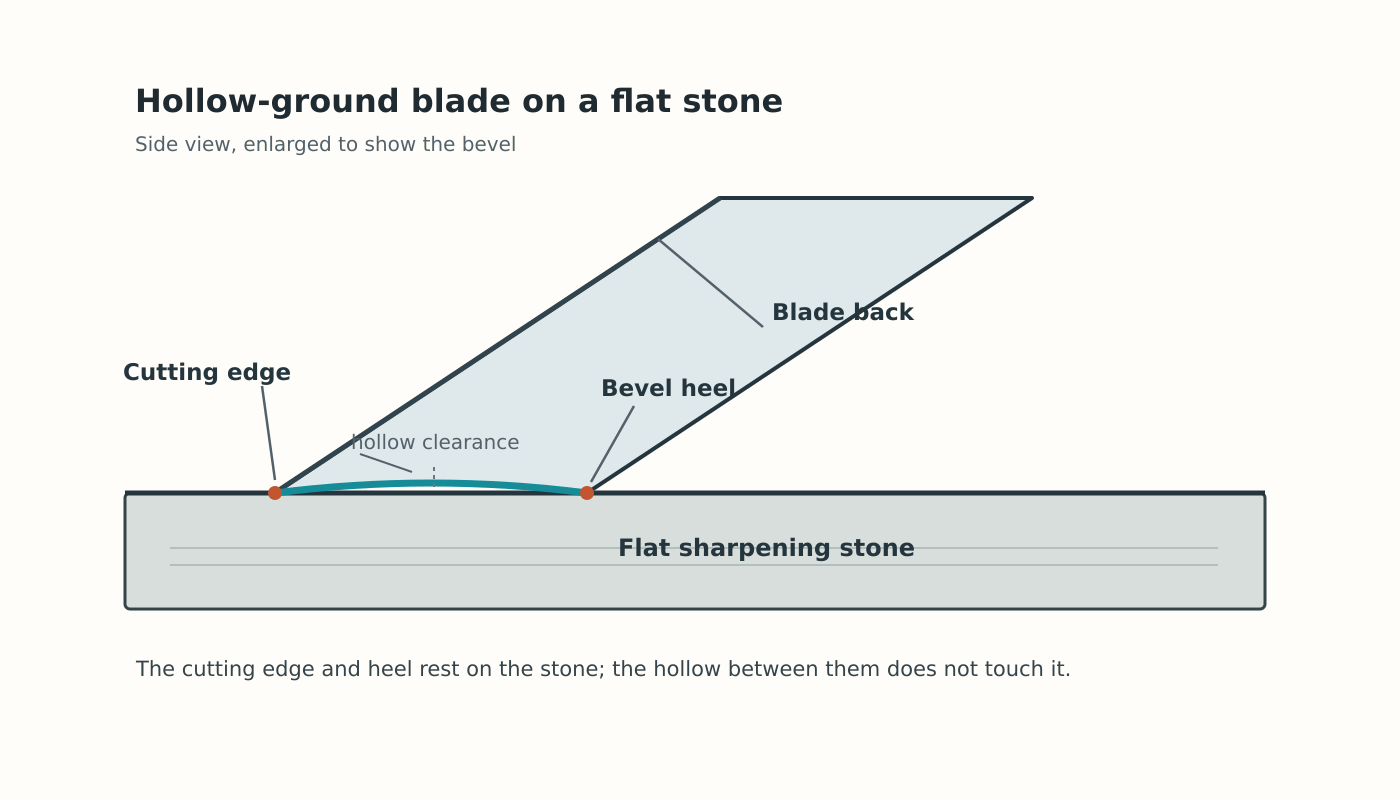
Most woodworkers I have talked to or read about who hollow grind before honing do some version of the same thing. They take the curved geometry left by the grinding wheel to a flat stone, diamond plate, or abrasive paper and create a flat final bevel.
There are important variations in how this is done, but the basic idea is the same.
The hollow grind makes freehand honing easier because the heel of the bevel and the cutting edge can both register against the stone. It is fast, simple, and effective, particularly if you have a good hollow grind to begin with.
Those of you who have read many of my essays probably know where I am going next.
Another stupid question.
Why do we flatten the bevel of a plane blade?
I am talking specifically about planes here because I understand the value of flat bevels on chisels and other tools.
But why planes?
I don’t know the answer.
Lately I have been rethinking almost everything about how we design and use wood cutting tools, and I have accumulated a growing pile of stupid questions I cannot answer.
This particular one showed up while I was drawing the cross section of a new spokeshave I am working on.
I was sitting at our kitchen table with a drawing about four times actual size in front of me. At that point it was just an imaginary spokeshave body. There wasn’t even a blade in it yet.
This is part of how I design.
I try to let go of what I think I know and mentally move into the thing I am drawing. I imagine what is happening at the critical points and ask what could be changed to improve the way it performs.
In this case, I started thinking only about the very tip of the blade, much the way I had earlier imagined the tip of a single 80 grit CBN particle.
I began listing the things I thought I “knew” about that edge.
Then I asked myself:
What in my actual experience proves that I know those things?
And from there I started questioning every experience I was using as evidence.
You can set aside, for the moment, whatever thoughts you are having about how inefficient or insane this sounds.
I could probably have several more tools on the market by now if I didn’t work this way.
But we already have tools that do traditional things very well. Those of you who walked through Handworks earlier this month know exactly what I mean.
I don’t feel compelled to beat those tools.
What I feel is more like an irritation in my mind. A nudge telling me there is still something worth looking for.
Sometimes that means shining a light on a part of the scenario we usually ignore. Sometimes it means flipping the whole thing upside down.
And sometimes it means asking what actually matters and temporarily throwing everything else away.
So let’s do that with a plane blade.
I’m including spokeshaves when I use the word “plane” here.
Bear with me while I spend a paragraph telling you something you already know. I need to get us onto the same trail before I can show you a path you may not have noticed.
What distinguishes a plane blade from many other cutting tools is that the blade is held in a body that maintains its relationship to the wood as the tool is pushed or pulled.
The cutting edge protrudes beyond the sole.
For that edge to enter the wood, the blade needs clearance behind it. If the underside of the blade simply continued parallel to the sole, the tool could not cut.
That brings me to two questions:
What, exactly, does that clearance need to clear?
And:
What geometry best supports the edge in doing its job?
Traditionally, we create that clearance with a flat bevel.
And that works.
In fact, many different bevel angles work. They have worked for generations, which gives us a very comfortable reason not to question them.
“If it ain’t broke, don’t fix it.”
But I like to redefine broke.
Sometimes what is broken isn’t the tool. It is our willingness to keep looking.
Tradition gives us confidence because it allows us to predict what will happen. Do this the way craftsmen have always done it and you can be reasonably sure of the result.
That is enormously useful.
It can also become a trap.
The older and more successful the practice, the easier it is to stop asking why we are doing it.
So let’s strip a plane blade down to a few things I think we can agree on.
On most smoothing and finishing planes, the blade protrudes past the sole only a very small amount, sometimes just a few ten thousandths of an inch.
Roughing tools such as jack and scrub planes can take substantially heavier cuts.
Whatever geometry we put behind the edge has to provide enough clearance for the blade to enter the wood at the intended depth of cut.
The cutting edge must remain the lowest point of that blade geometry as it moves through the wood.
Reducing the clearance angle puts more steel behind the edge and increases its support.
But reducing clearance also leaves less room for wear before the surface behind the edge begins interfering with the cut.
Increasing the clearance angle makes that interference less likely, but removes more support from directly behind the edge.
That probably isn’t the complete list.
But it is enough to get us into trouble.
Let’s start with the first point.
The amount of blade actually projecting beneath the plane is tiny.
Once I really hold that image in my mind, another question starts making noise:
How important is the shape of all the bevel that remains inside the plane body?
And then the question that really got me:
Why does that bevel need to be flat at all?
Think about what we are doing.
We intentionally create a hollow with a round grinding wheel.
Then we go to a flat object and remove part of that hollow to create our finished edge.
Why?
Humans have been finding useful things to do with round objects for a very long time. wheels, bearings, soccer balls…..
So why, once we finish grinding, do we abandon the curve?
What if the clearance surface stayed curved?
What if we honed the edge on something round?
The closer the steel behind the cutting edge remains to the plane’s sole, the more material we can leave behind that edge to support it.
And if only a tiny amount of blade is actually projecting beneath the sole during a normal cut, how much of the rest of that bevel really needs to participate in providing clearance?
Why flatten any of it?
Why not let the curve continue from the edge toward the heel and finish the cutting edge on a curved honing surface instead?
Which brings us to the next obvious problem.
If the surface is curved, how do you measure the clearance “angle” or cutting “angle”?
The answer begins at the cutting edge.
At any one point on a curved surface, we can draw a straight line tangent to the curve. That tangent tells directs our calculation for the angle of the curved surface at that exact point.
That distinction matters.
If I want to put a 35 degree bevel on a blade that sits at 45 degrees in a conventional bevel down plane, the clearance immediately at the cutting edge is 10 degrees. The bevel itself may be curved, but at the very tip, the tangent can still give me a perfectly definable 35 degree blade angle and, in that 45 degree plane, a 10 degree clearance.
That is the part of the geometry I care most about.
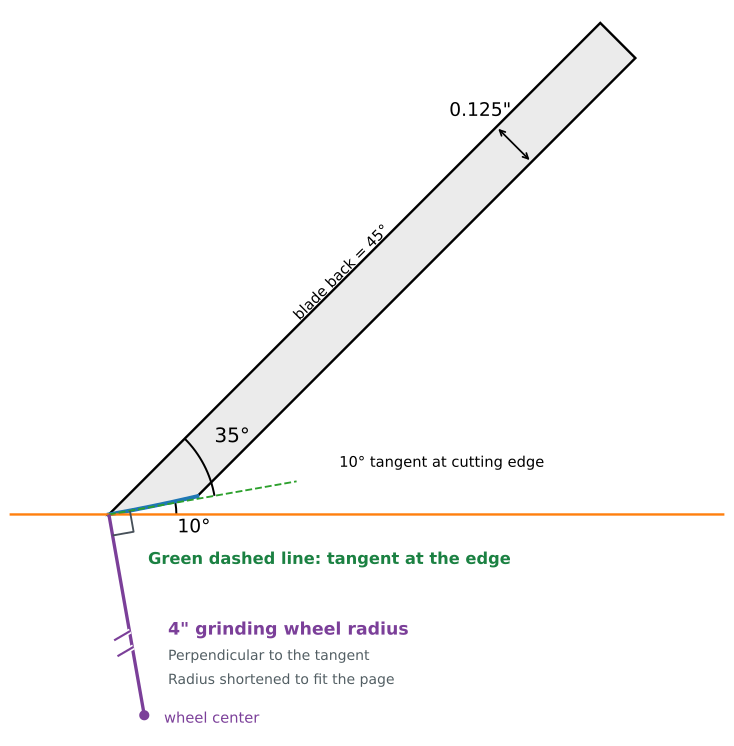
At the grinder, I need to use exactly the same idea to establish the bevel angle.
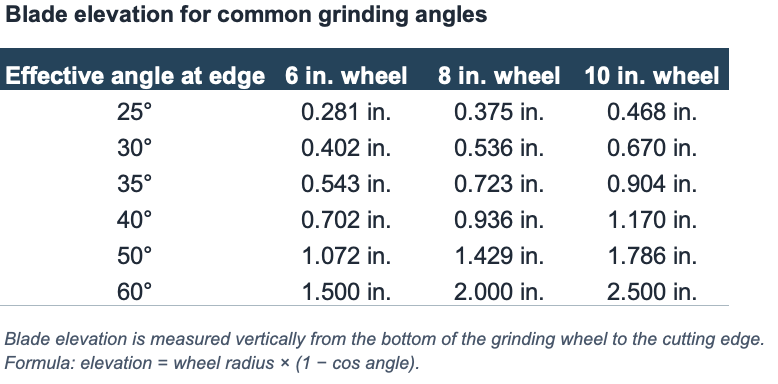
I hold the back of the blade as my reference and raise the cutting edge relative to the bottom of the wheel. That determines where the blade meets the wheel and therefore the tangent angle at the edge.
Blade elevation for common grinding angles
This has also made me question the way we hold the blade at the grinder.
Most grinding fixtures reference the bevel face of the blade. But the angle I care about is the one between the ground surface at the edge and the blade’s back.
When referencing a blade to the grinder in the traditional way (bevel down with the blade above the wheel) )the blade thickness changes the angle reference such that if I change to a blade of a different thickness I change the clearance angle.
Why use the less important face as my reference and then compensate for the difference?
And once I have ground the hollow, why move to a flat stone and turn the working part of that curve into a flat bevel?
The heel and edge make convenient points of contact for freehand honing. I understand the attraction.
But that convenience does not tell me whether flattening the bevel makes the blade work better.
This is where I have started doing something different.
My current grinding wheel is 8 inches in diameter, which gives me a 4 inch radius at the bevel. Instead of taking that hollow ground blade to a flat stone, I take it to a round honing mandrel with a 1.25 inch radius.
I finish the edge on that mandrel with .5 micron diamond paste.
The relationship between those two radii is the important part.
I orient the center of the honing mandrel on the same radius line that runs from the grinding wheel center through the cutting edge. That makes the 4 inch grinding arc and the 1.25 inch honing arc internally tangent at the cutting edge.
They touch at exactly the place that matters, and at that point they share the same tangent.
That means I can hone a very small area right at the cutting edge without changing the actual “angle” of the edge.
In effect, I get the sharpening advantage of a microbevel without changing the geometry I established at the grinder.
I am not polishing the entire bevel.
I am not honing the edge of the hollow grind.
I am polishing a very small band of steel where the cutting actually happens.
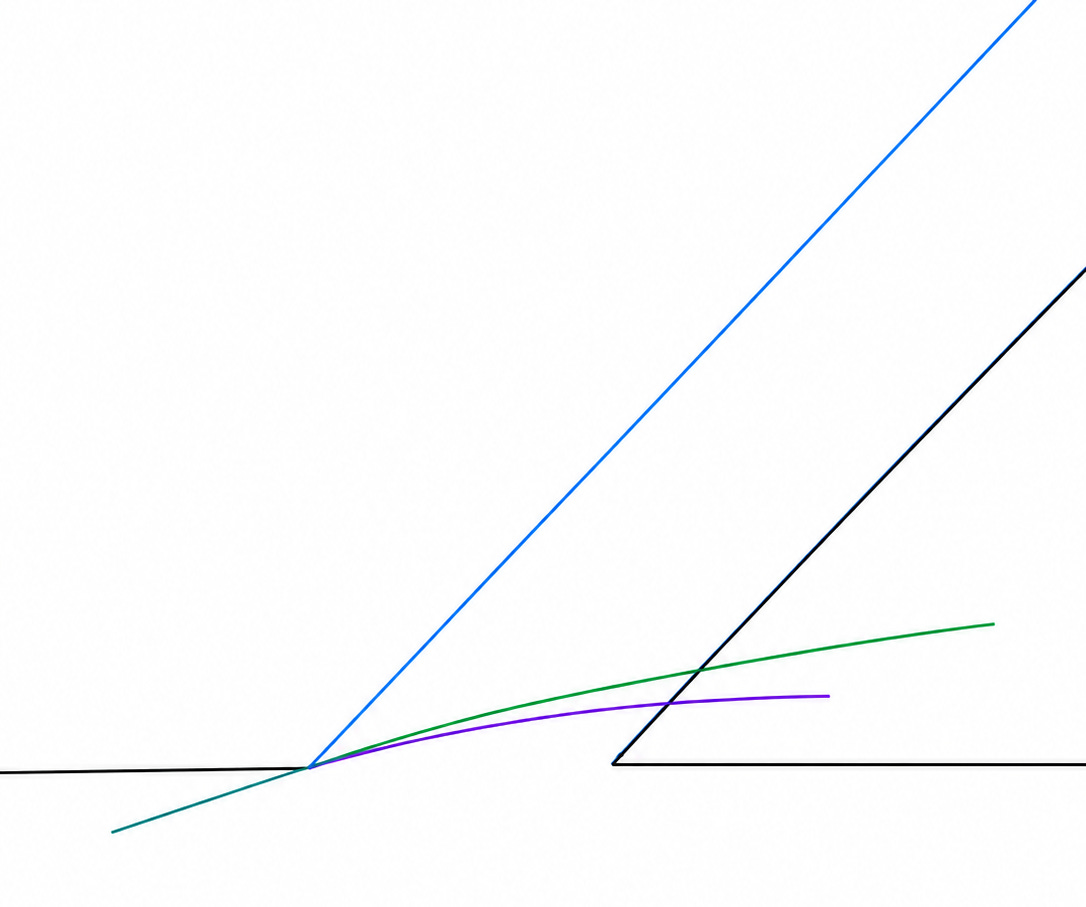
The two arcs at the bevel of the blade represent the 4” grinder radius (green) and the 1.25”radius honing mandrel (purple). These internally tangent arcs allow me to hone a micro bevel without effecting the relief angle. This allows me to put the heel of the blade lower than the traditional flat bevel method and provides more support for the cantilevered edge. The smaller the grinding wheel, the lower that heel can be without impacting the clearance angle.
That does two things I find interesting.
First, it makes honing very fast because I am working so little steel.
Second, it allows me to retain the curved relief created by the grinding wheel instead of replacing it with a straight line between the heel and the edge.
On an 8 inch wheel the difference between that hollow and a flat bevel is not dramatic. Looking at the geometry at scale makes that obvious.
But the difference is real.
And once I started thinking about the bevel this way, another relationship became interesting.
The smaller the grinding radius, the farther I can move the heel of the bevel toward the plane’s sole while maintaining the same tangent angle, and therefore the same clearance, at the cutting edge.
That means more steel can remain behind the cantilevered edge giving ther cutting edge more support.
I am not claiming yet that I have found the ideal radius, or even that the geometry I am using now is the final answer.
I am still experimenting.
What interests me is that once I stopped treating the flat bevel as a requirement, a whole set of other possibilities became visible.
The grinding wheel does not have to create a temporary shape that I later erase.
The hollow itself can become part of the finished geometry.
The honing surface does not have to be flat.
And a microbevel does not necessarily have to mean changing the angle at the ground edge.
I have been going from the round grinding wheel to the round honing mandrel because I can work on that tiny area right at the edge while keeping the curved relief behind it.
In my own sharpening, that has been fast and consistent, and it leaves me with more steel supporting the edge than I would have with the flat bevel I used to hone.
I am still working out what this means for different blades and planes.
The point of all of this is to keep asking what the blade needs, rather than assuming that the shape we have always honed is the only one that works.
From the Bench – Brian Boggs
Brian has spent more than four decades learning from wood, tools, mistakes, teaching, and making. He is still at the bench, working, questioning, experimenting, and finding new things to understand and share.
These essays are our way of capturing that ongoing work and putting it into the world.
If you believe this kind of knowledge is worth documenting and sharing, becoming a paid subscriber helps support the work of capturing it while Brian is still at the bench.


